# Lab instructions
The assignments are about creating cross-platform smartphone applications using Vue Native. To do this you need to have a smartphone. Contact the course coordinator at linus.rudbeck@redcapes.se if you don't have one you can use, and he might be able to borrow you one/fix it somehow.
The assignments should be carried out individually. Feel free to help each other, but don't cheat. For example, helping your friend to debug his/her code is OK, but giving your own code to your friend is not OK.
# Presentation & Grading
When you have completed an assignment, you should upload your solution to Canva and then present it orally to a teacher at one of the lab sessions. At the lab sessions you can also ask questions to a teacher and get help with completing the assignments
Each assignment contains some optional tasks you can complete to get extra points. The number of extra points you collect across all the assignments determines which grade you'll get on the laboratory work. If you just want to pass (get grade 3) you don't need to collect any extra point. To get grade 4 you need to collect at least 4 extra points. To get grade 5 you need to collect at least 6 extra points. There are 8 points in total (4 in each assignment). To get the extra points for an assignment you need to complete and present the optional tasks to a teacher before the deadline written in each document.
There exist no deadlines for the assignments, but since you must present them orally to a teacher, you have to do it before the end of the last lab session.
To pass the laboratory work you need to complete the assignments described below.
# Lab 1 – Creating a Vue Native app
A Vue native application runs as a native application on any supported platform; on Android it will run as an Android application, and on iOS it will run as an iOS application. The beauty with Vue native is that you do not need to write code both for the Android application (which uses the programming languages Java and Kotlin) and for the iOS application (which uses the programming language Swift); you just write code for your Vue Native application, and then it runs automatically on both platforms (with some limitations).
To make this happen, Vue Native applications are implemented as ordinary websites consisting of HTML, CSS and JavaScript code. Both Android and iOS support rendering HTML files directly inside the application, and this is what Vue Native is using.
A limitation with websites like this is that we cannot access a device's native features (such as accelerometers and contact list) through traditional JavaScript executed in a web browser environment. To remedy this, Vue Native provides us with a React Native functions we can use to access these features.
The intention of this lab is to teach you to the basics in Vue Native, including:
- How to create an application.
- How to run your application on a smartphone.
- How to access a smartphone's native features.
In this lab, you will create an application consisting of multiple Vue files, and each file should solve one particular problem. To help you get started we provide you with some guiding steps.
# Step 1 – Create and run your Vue Native application
Follow the steps used in Lecture 2: Introduction to Vue Native and the instructions found at Vue Natives official documentation website. Follow the instructions found under For Expo users, found here.
# Step 2 – Complete the tasks
Complete the tasks 1-4 below, and then present your work orally to a teacher
# Task 1: Creating all pages.
The first task is to create all the Vue Screens you need to solve the rest of the tasks. When you are done, you should have created an application conforming to Figure 1 below
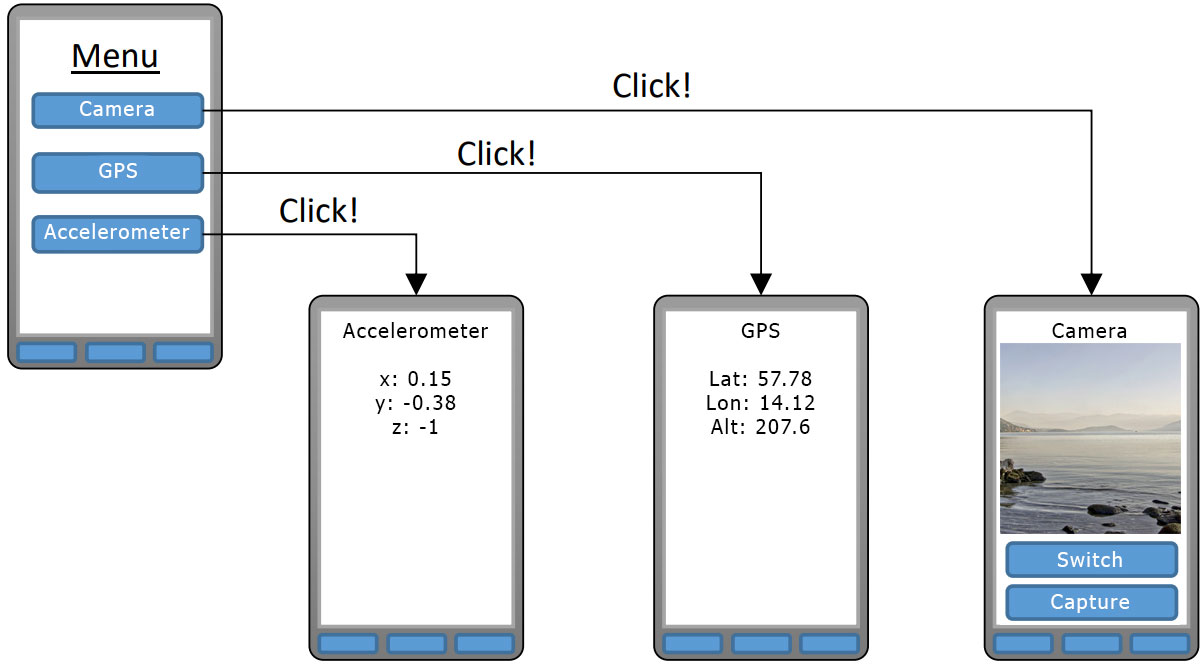
Figure 1, Picture of the application to be created
As you can see, you need to create three new screens as well as making changes to your existing start screen. When you are done, it should be possible to navigate between the pages (on Android devices one can use the back button to go back to the menu page, iOS devices might need need an explicit back link). Feel free to improve the design.
# Task 2: Showing the accelerometer data
On the battery page, you should retrieve and show the device's accelerometer data (x, y and z). You can use the Vue Native device APIs found here.
# Task 3: Showing the current GPS location
On the GPS location page, you should show the device's current latitude, longitude and altitude. You can use the Vue Native device APIs found here.
# Task 4: Using the camera
On the Camera page, you should show the device's camera and let the user switch between the fron and back camera as well as capturing an image. You can use the Vue Native device APIs found here.
# Optional tasks
Complete (some of) the following optional tasks to earn extra points which can give you a higher grade for the laboratory work test. These must be presented orally to a teacher at a lab session no later than YYYY-MM-DD.
# Optional task 1 (1 point)
Add another page to your application showing a button. When you click on the button, the phone should vibrate (how it should vibrate is up to you to decide).
# Optional task 2 (1 point)
Add another page to your application showing which language (English, Swedish, etc.) the device has been configured to use. This page should also show some text written in the language being used.
# Optional task 3 (2 points)
Add another page to your application showing (using graphics) how the device is moved around (the accelerometer data). Text does not count as graphics this time.
# Lab 2 – Communicating with a backend
The applications we have created in the labs so far have not been able to share data with other applications. Data captured on Device A has been stored and available only on Device A. The easiest way to make the data available to other devices is by uploading the data to a server on the Internet, and then download it to the other devices from this server.
Implementing a server (the backend) requires a lot of work. To facilitate this, we will use Firebase, which is a Backend-as-a-Service product from Google. Through it, we will be able to upload our data from Device A to our Firebase project hosted on the Internet, and then have it automatically downloaded to all our other devices connected to the same Firebase project. Firebase does also have support for user accounts, so we can also easily keep track of our users.
The intention of this lab is to teach you the basics in building a Vue Native application synchronizing data with a Firebase project, including:
- How to use user accounts in a Firebase project.
- How to store data in a Firebase database (Firestore).
- How to read data from Firestore.
- How to listen for data changes in Firebase and automatically update the GUI when they occur using Vue.js.
In this lab you will create a small application functioning as a chat where all users can send messages to all other users. To help you get started we provide you with some guiding steps.
# Step 1 – Getting started
- create Vue project
- Add firebase
- Create firebaseproject
- Add keys
How to use Firebase guide here
More information about setting up Firestore can be found at: https://firebase.google.com/docs/firestore/quickstart
# Step 2 – Implement the application
Figure 1 below shows how the application should work in the end with proper usage (e.g. clicking on the Sign In button when correct credentials has been entered in the form).

Figure 1, Picture of the application to be created.
You may implement this application however you please as long as you use Vue.js and Firestore. If you find that hard you can implement it piece by piece by completing the tasks below in order.
# Task 1: Defining the overall structure
By the look of Figure 1 above, the application seems to consist of three different "pages". A good strategy is to implement the content of these three pages as Vue components (SignUpComponent, SignInComponent and ChatComponent), and have the App component display one of these at a time (similar to what you did in lab 2). So the App component will simply render a screen looking like the one shown in Figure 2 below (Page Content is rendered as one of the three React component you are about to create).
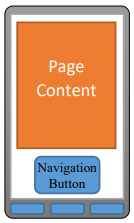
Figure 2, The structure of the App component.
Start by adding a state variable to the App component keeping track of which page the user is using at the moment. Then create the three new page components SignUpComponent, SignInComponent and ChatComponent (to start with they can simply display static text, or similar) and change the code in the App component to show the correct page component using the navigation button.
When you are done, your application should look something like the one shown in Figure 3 below (note: at the moment you should only be able to navigate between the Sign In page and the Sign Up page).
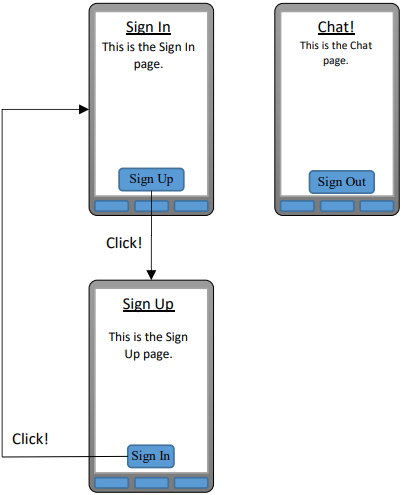
Figure 3, The navigation for the application almost completed.
# Task 2: Implementing the SignUpComponent
Change the SignUpComponent so it is rendered as shown in Figure 1. If you want you can ignore the Username box, and only use Email box and the password box. If you want to use the Username box, you need to update the user's displayName with the provided username after the user has successfully signed up by calling the updateProfile function in the user object.
When the user clicks on the Sign Up button, a request should be sent to your Firebase project to create a new user with the given credentials (email and password). To do this, use the function createUserWithEmailAndPassword. If something goes wrong, simply show the error message in an alert box (if you want to show the error message in your HTML code, feel free to do that instead, but it requires more work).
When the user has successfully created a new account, you want to take the user to the Chat page. The user will automatically be signed in when he creates a new account, so the App component should listen for this event by using the function onAuthStateChanged. Start listening for this in the created function in you App component.
# Task 3: Implementing sign out functionality
When the user is signed in, he should be on the Chat page, and the App component should render the Sign Out button at the bottom of the screen. When the user clicks on this button, he should be signed out and taken to the Sign In page. Implement this functionality by calling the function signOut when the user clicks on the button.
# Task 4: Implementing the SignInComponent
Change the SignInComponent so it is rendered as shown in Figure 1. When the user clicks on the Sign In button, a request should be sent to your Firebase project to sign in as the user with the given credentials. Do this by calling the function signInWithEmailAndPassword. If something goes wrong, simply show the error message in an alert box (if you want to show the error message in your HTML code, feel free to do that instead, but it requires more work).
If the user successfully signs in, he should automatically be taken to the Chat page (you have already implemented this functionality, so you should not need to write any more code to make this happen).
# Task 5: Implementing the ChatComponent (part 1: Posting new messages)
Chat messages needs to be stored in the database. It makes sense to store all messages in the same format in the same collection. Each chat message can be represented as an object with the keys name and message, e.g. {name: "Peter", message: "Hi everybody!"} (you can use the user's email address as name if you skipped the user's username in the SignUpComponent; the user object can be retrieved with the following expression: myFirebase.auth().currentUser).
To start with, implement the ChatComponent so it contains a form the user can use to write chat message with, as shown in Figure 1. Then when the user clicks on the Send button, the chat message should be pushed into a collection in the database (you can name the collection "messages"). Use the add function on the collection to do this.
When you are done, you should be able to see the chat messages all users have posted if you inspect the database using the Firebase console.
More information about inserting data: https://firebase.google.com/docs/firestore/manage-data/add-data#add_a_document
# Task 6: Implementing the ChatComponent (part 2: Rendering all chat messages)
The ChatComponent should of course also render all posted chat messages. To do this, all chat messages needs to be stored in an array in the state of the component, so the component is re-rendered when a new chat message is received (when we receive a new chat message we create a new array with all the chat messages, and change the state of our component to this new array instead).
To get started, you can in the data function in the ChatComponent hardcode it to store some chat messages, e.g. [{name: "abc", message: "cba"}, {name: "123", message: "321"}]. Then change the HTML code of the component so these hardcoded chat messages are shown on the screen when the component is shown, as shown in Figure 1. When you are done, proceed with next paragraph.
The chat messages rendered on the screen should of course not be hardcoded; they should come from the database. In the function created in the ChatComponent, it makes sense to retrieve all chat messages stored in the database, and when we retrieve them, we update the state of the component with a new array of these messages, so the component is re-rendered. Here you probably want to listen for chat messages posted in the future as well, so rather use onSnapshot function instead of the get function. However, if you use the onSnapshot function, remember to call the unsubsribe function in the destroyed callback on your Vue component.
More information about listening for data: https://firebase.google.com/docs/firestore/query-data/listen#listen_to_multiple_documents_in_a_collection
# Optional tasks
Complete (some of) the following optional tasks to earn extra points which can give you a higher grade or the laboratory work test. These must be presented orally to the teacher no later than YYYY-MM-DD.
# Optional task 1 (1 point)
Make it possible for a user to delete his own chat messages.
# Optional task 2 (2 points)
Make it possible for a user to edit his own chat messages.
# Optional task 3 (1 point)
Make it possible for a user to delete his own account (all chat messages he has posted should be deleted at the same time).
You need to submit your project before the end of 2021-10-24